
hidden giant trunk grain is the moment a rough trunk becomes readable material. The first opened face can show color, cracks, figure, moisture risk, and the best direction for later cuts. For a sawmill or workshop, the right response is not hype; it is support, inspect, mark, and protect the grain before the next pass.
First Reading From The Opened Face
Hidden giant trunk grain is useful because it turns guesswork into visible evidence. Before the trunk is opened, a crew can read only outside clues: bark condition, end checks, shape, branch scars, dirt, and weight. Those clues help, but they do not show the full figure inside the wood. The first opened face changes the job because the material finally gives the workshop something specific to judge.
The most important reading is grain direction. Long grain movement can guide table slabs, panels, doors, benches, or decorative faces. Tight figure near one zone may deserve to be saved for a smaller feature part instead of being lost in a wide cut. Grain that reverses sharply may warn the crew that tear-out, planing difficulty, or later movement will be part of the build.
Color is the next reading. Fresh wood can look different before dust is removed, before it dries, and before any finish test. That means a dramatic face should be treated as a starting point, not a guaranteed showroom result. A careful shop photographs the face, wipes a small test area if appropriate, and compares the color pattern before cutting away material that might become the best visible surface.
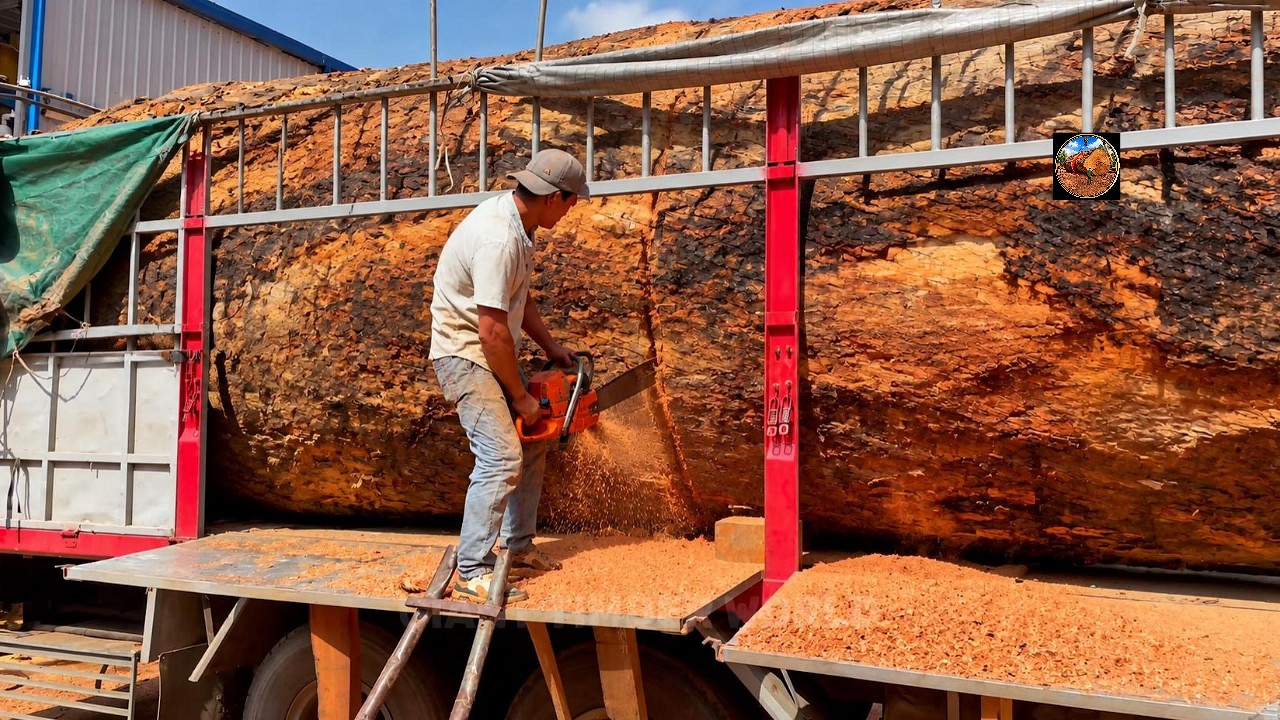
Defects complete the first reading. Checks, knots, bark pockets, pith, stains, insect trails, and soft zones are not automatically failures. Some become design character. Some need trimming. Some should be kept away from joinery. The practical lesson is that the first reveal should slow the job down. Once the face is visible, the best sawmill work looks more like layout than performance.
Sawmill Setup Before The Reveal
The reveal only matters if the setup is controlled. A large trunk can roll, shift, pinch a blade, or drop unexpectedly when support is poor. Before the cut, the crew needs stable bearing points, a clear walking area, a predictable feed path, and a plan for where offcuts will go. This is the unglamorous part of the work, but it decides whether the grain can be inspected safely.
Support should match the shape of the trunk. Round sections need blocking that resists rolling. Partly flattened sections still need checks for rocking. Heavy slabs need outfeed support so the cut does not break at the end or force the operator into a bad stance. A fast cut on unstable stock can damage the best face before anyone has a chance to read it.
Blade condition also belongs in the setup. Bark, grit, soil, and hidden debris can dull a blade quickly. If the first pass is only an opening pass, the crew may accept a rougher surface. If the first pass is meant to create a reference face, the blade, feed rate, and support must be cleaner. Tecatool readers should notice that the right tool choice depends on what the next operation needs, not only on the size of the wood.
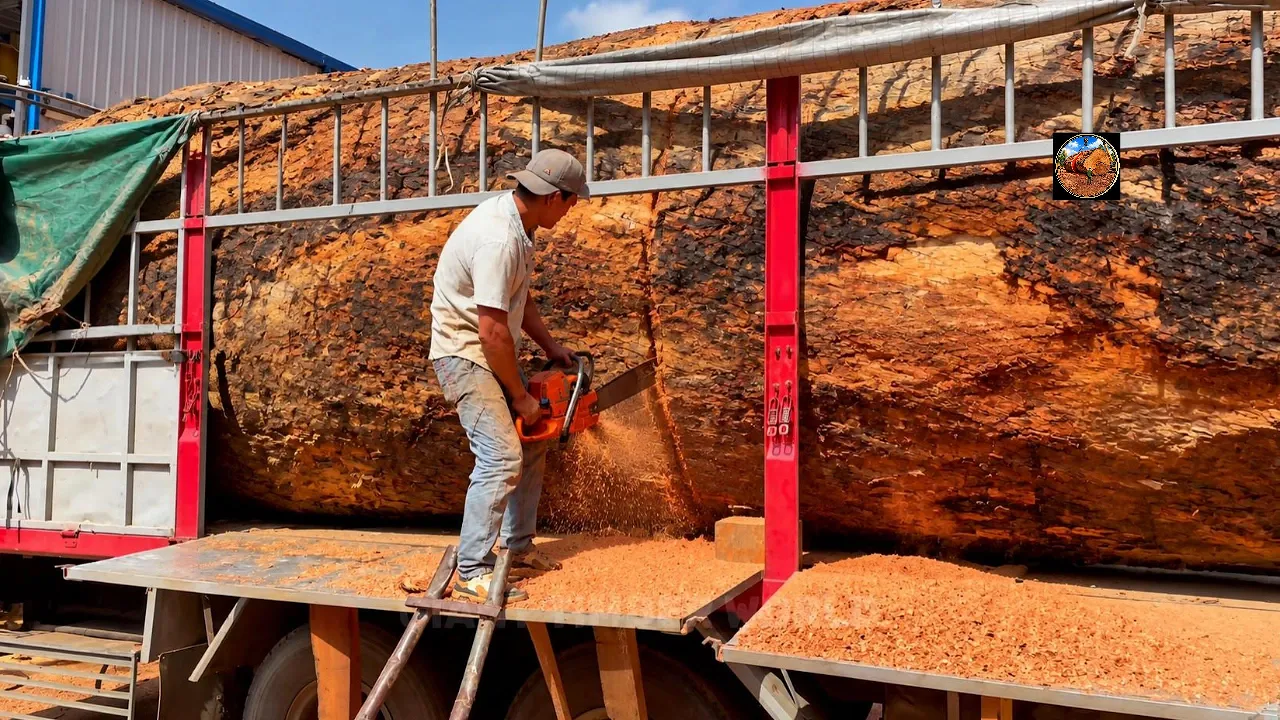
A controlled setup also protects the people around the machine. Spectators and helpers should stay out of the line of force. Hands should not chase a moving offcut. The operator should be able to stop without stepping over cords, bark, clamps, or scrap. Hidden giant trunk grain can be exciting to watch, but the work zone should still be boring, clear, and conservative.
Cut Planning After Hidden Giant Trunk Grain
After hidden giant trunk grain is visible, the next decision is where the best wood should go. A wide slab may look impressive, but width alone is not the goal. The goal is to preserve the strongest figure in a part that can dry, flatten, and live in service. That may mean one large slab, a bookmatched pair, several panels, a bench seat, stair parts, or smaller accent pieces.
A strong layout pass starts with marking the cleanest continuous figure. The crew should then mark defects, possible trim lines, and areas that need extra allowance for flattening. A chalk line, pencil, straightedge, and a few photos can protect more value than another quick saw pass. The first cut reveals the story; the layout pass decides whether the story survives.
Waste control does not mean forcing every piece into the same product. Offcuts with stable straight grain may become rails, legs, drawer fronts, wedges, or test samples. Sections with dramatic figure but weaker structure may work better as decorative faces than load-bearing parts. Sections with deep checks may need trimming before they tempt the maker into a fragile design.
This planning mindset is also the best buying lesson. A larger saw is not useful if the shop cannot support the material, mark the layout, flatten the output, or dry it correctly. Many readers would benefit more from sharp blades, moisture checks, straightedges, clamps, and dust control than from chasing the biggest machine in the video.
Cracks, Moisture, And Defect Control
Cracks are part of the decision, not just part of the damage. End checks may be trimmed away. Surface checks may become bowtie details. Deep cracks across a narrow part may be a reason to change the layout completely. The important habit is to separate visual character from structural risk. A crack that looks beautiful on camera can still be a weak point in a table, bench, or door.
Moisture is just as important. Freshly opened timber may still hold water deep inside even if the surface looks usable. Thick slabs can move for a long time. If the shop flattens, joins, or finishes too early, the final piece may cup, twist, split, or open joints later. A moisture meter, stickered storage, airflow, and patience often protect more value than a dramatic second cut.
Drying strategy depends on thickness, species, climate, and intended use. The source footage can show process, but it cannot prove a complete drying schedule by itself. That is why this article avoids exact species, age, horsepower, and price claims. The visible evidence supports a practical story about grain reading, machine control, and material handling. Anything beyond that needs another verified source.
Defect control also affects finishing. Resin pockets, soft areas, stains, tear-out, and hidden voids can change sanding and finish choices. A small finish test helps the maker see whether the grain becomes warmer, darker, flatter, or more dramatic. Testing before final layout is cheaper than discovering too late that the best-looking area does not match the intended finish.
Drying And Storage After The Camera Moment
The camera moment is not the end of the wood story. Once hidden giant trunk grain is visible, the material still needs a storage plan that respects thickness, airflow, and movement. If the slab is stacked carelessly, the best face can cup or twist before it reaches the bench. Stickers should be consistent, weight should be distributed, and the stack should be protected from sudden sun, rain, or extreme airflow that dries one side too quickly.
End sealing may be useful when the ends are vulnerable to rapid moisture loss. The exact product and timing depend on the material and local practice, so the safest article claim is general: slow, even drying protects more value than rushing. A dramatic grain reveal can tempt a shop to jump straight to sanding or sales photos, but thick timber rarely rewards impatience. The more valuable the figure looks, the more carefully the shop should control the months after opening.
Moisture checks should be recorded, not guessed. A single reading on the surface is not enough for a thick slab, but a meter still helps the maker compare progress over time. When readings stabilize and the slab has had time to equalize, the shop can decide whether final flattening is realistic. This is where process discipline turns a good video subject into usable woodworking material.
Tool Lessons For Smaller Workshops
Most readers will not process a giant trunk at full sawmill scale, but the workflow still translates. Stabilize the stock before cutting. Create a reference face before chasing final dimensions. Use the sharpest suitable blade. Keep hands and body out of the danger path. Mark the best face before trimming. Confirm moisture before final joinery. Those habits matter whether the material is a huge trunk or a single rough board.
For rough breakdown, a chainsaw mill, bandsaw mill, track saw, or circular saw may be appropriate depending on the size and support. For flattening, a planer, jointer, router sled, or hand plane may be better. For finishing, scrapers, sanders, dust extraction, and test boards become important. The lesson is to build a tool chain, not to believe one machine solves every step.
Small shops should pay special attention to dust and handling. A large surface creates a heavy dust load quickly. A heavy slab also needs help moving, flipping, and clamping. Using sawhorses that are too light or a bench that is too small can turn a promising grain reveal into a safety problem. The best tool is often the support system that lets the cutting tool work calmly.
For related process checks, see Tecatool’s guide to wood processing machine safety checks. The same principle applies here: understand the workholding, material behavior, and next operation before asking the tool to do more.
Tool buying CTA: Before you buy a saw blade, moisture meter, dust collector, router sled, planer, or support stand for oversized timber work, compare the job against Tecatool’s wood processing machine buying and safety guide. It is the practical next step for matching equipment to the cut instead of buying on size alone.
Common Mistakes To Avoid
The first mistake is believing size proves value. A massive trunk can contain beautiful wood, but size does not remove cracks, stress, moisture, or layout problems. The second mistake is believing a dramatic title proves species, price, or age. Those details should be stated only when the source verifies them clearly. In this case, the safer value is the visible sawmill process and the grain-reading lesson.
The third mistake is cutting too quickly after the reveal. Once the face opens, stop and study it. Mark the best figure, mark defects, and decide what finished parts deserve the cleanest stock. A rushed second cut can remove the very section that should have become the show face.
The fourth mistake is treating images as decoration. Process images should support the section they appear beside. A frame of the opened face belongs near grain reading. A frame of the setup belongs near workholding and safety. A later-stage frame belongs near layout or finishing.
How Buyers Should Read The Finished Material
A buyer looking at lumber from a giant trunk should ask what the opened face proves and what it does not prove. The face can prove visual character, obvious defects, approximate figure direction, and whether the material deserves a closer look. It cannot prove long-term stability by appearance alone. It also cannot prove exact species, age, or final value unless the seller provides separate documentation. That distinction protects both the buyer and the workshop.
The buyer should also ask how the slab was stored after cutting. Sticker spacing, drying time, moisture readings, and flattening allowance matter because they decide whether a beautiful face will remain useful. If the slab has already been flattened, ask how much thickness remains for final work. If the slab is still rough, ask how much movement is expected before final milling. These questions are more useful than asking only whether the grain looks rare.
For tool planning, buyers should think about the whole path from rough stock to finished surface. A saw gets the material open. A straightedge and winding sticks show movement. A router sled, planer, or jointer creates reference. Scrapers and sanders prepare the surface. Clamps and cauls keep assembly honest. Finish tests decide how much contrast the grain will show. Hidden giant trunk grain is impressive because it begins this path, not because it finishes it.
Why This Source Fits Tecatool
This source fits Tecatool because it connects machinery, material judgment, and reader decisions. The value is not just watching a large piece of wood open. The value is seeing how a workshop should think after the grain appears. That is the bridge between video interest and practical woodworking content. It gives readers a way to inspect similar footage, plan safer cuts, and buy tools with a clearer reason.
The article also stays within claim boundaries. It does not invent a final sale price, record size, exact age, or guaranteed species. Instead, it explains visible sawmill workflow, grain reading, support, defect control, drying, and tool sequence. That makes the page more durable for search because it answers practical questions instead of repeating one dramatic headline.
For future source-based woodworking posts, this is the standard to keep: start with what the footage clearly shows, explain why that step matters, add practical workshop context, and tell readers which claims still need proof. A strong Tecatool article should help someone watch the video more intelligently and make better choices in their own shop.
Practical Checklist Before The Next Cut
Before the next cut, the crew should answer a simple checklist. Is the trunk still stable after the first opening? Is the best face marked clearly enough that another worker can understand the plan? Are cracks marked as trim zones, design features, or structural risks? Is there enough thickness left for flattening after drying? Has anyone checked whether the next cut will release stress and move the slab?
The next question is whether the tool path is still safe. A setup that was safe for the first cut may change after weight is removed. The remaining piece may sit differently on the bed, and the offcut may need a new support point. This is why experienced shops re-check workholding between passes. Hidden giant trunk grain can distract people with the beauty of the face, but the machine only cares whether the material is controlled.
The crew should also decide what information must be saved. A photo of the opened face, a mark for the show side, a note about defect locations, and a moisture reading can all help later. These records are small, but they make the project easier to resume after drying or transport. Without them, the original grain decision can be lost when the slab moves to another bench or another worker takes over.
Finally, the workshop should match the next cut to the final use. If the best grain belongs in a tabletop, preserve width and thickness. If the strongest material belongs in legs or rails, cut for stability. If the face is mostly decorative, plan veneer, panels, or accents instead of pretending every section can carry load. This is the practical value of slowing down after a reveal: the next cut becomes a choice, not a reaction.
FAQ
What does hidden giant trunk grain show first?
It shows grain direction, color contrast, checks, knots, and the areas worth protecting before the next sawmill cut.
Should the crew cut again immediately after the reveal?
No. The better move is to inspect, photograph, mark defects, check support, and decide which sections deserve to become visible parts.
What tools matter most after the first cut?
Useful tools include sharp saw blades, straightedges, moisture meters, clamps, router sleds or planers, sanders, and dust collection.
Can the video prove the exact wood species or price?
No. The visible source supports process and grain observations, but exact species, age, horsepower, and price need separate verification.
Source Video
Sources: