
giant log grain reveal is the moment when a rough log stops being only heavy stock and starts giving the workshop a real plan. The useful lesson is simple: inspect the opened face, protect the best grain, cut slowly, and match every next tool choice to what the timber actually shows.
Why The Reveal Matters
A giant log grain reveal attracts attention because it changes the whole job in one visible step. The outside of a log can look plain, dirty, cracked, or even disappointing. Once the face opens, the shop can finally see the lines that decide whether the material should become a tabletop, cabinet panel, stair detail, bench slab, or smaller matched components. That is the practical value of the source video. It is not just a dramatic cut. It is a decision point.
For a Tecatool reader, the important part is not guessing the species, age, exact market price, or hidden history. Those claims are not confirmed by the visible source. The useful part is studying the workflow: support the timber, open it cleanly, read the face, mark the strongest areas, and avoid rushing into the next cut before the grain has been understood. That is how a workshop protects value without pretending to know more than the footage proves.
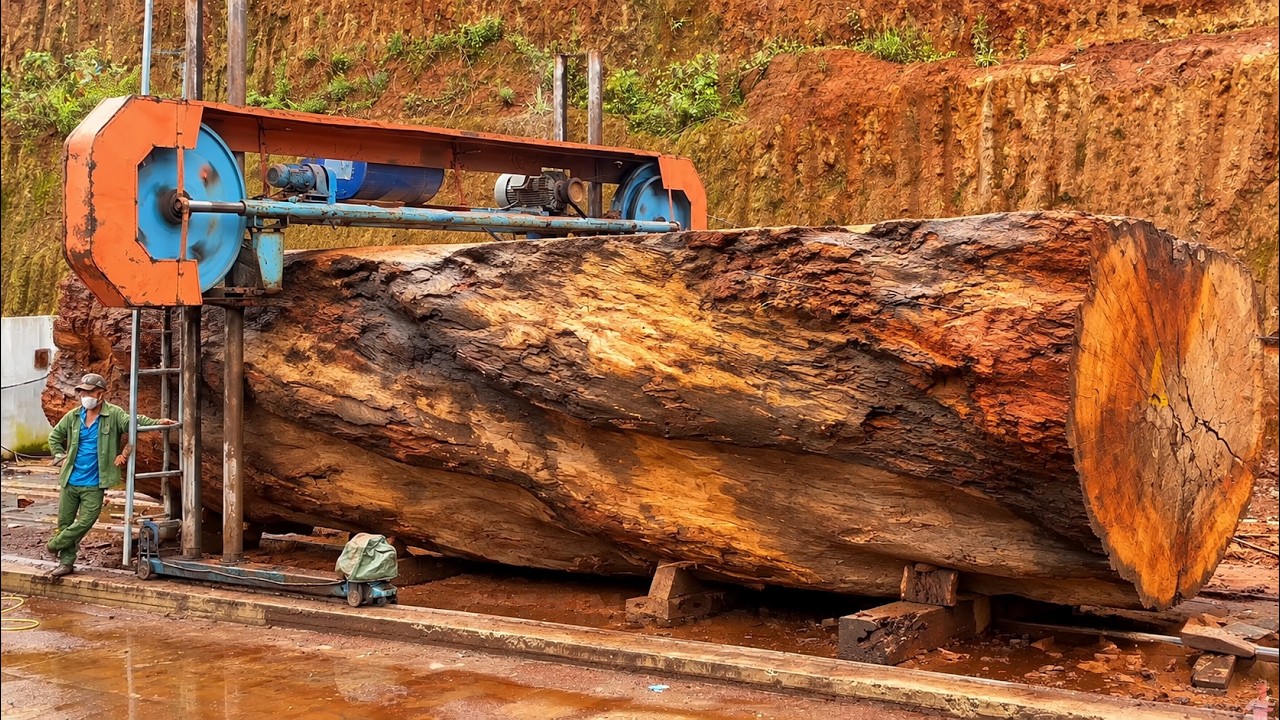
The first reveal also affects safety. Large timber is awkward, unstable, and unforgiving. A small board can be turned by hand. A log or heavy slab needs support, clear walking space, predictable tool paths, and enough patience to pause between operations. If the shop treats the reveal like a showpiece only, it can miss checks, embedded stress, soft pockets, or grain reversal. If the shop treats it as inspection, the next steps become calmer and more profitable.
The First Read Of The Timber Face
The first thing to read is direction. Grain lines tell the maker how the part may move, where tear-out is likely, and which faces deserve to stay visible. Long, sweeping lines can suit a tabletop or wall feature. Tight figure near the center may work better as a smaller accent. A dramatic patch near a crack may look beautiful, but it may also require stabilization, trimming, or a design that does not put stress across the weakest area.
Color is the second reading. Freshly exposed wood often changes as dust is removed and finish is tested, so the source frame should be treated as a starting point, not a final showroom promise. A shop can wipe a small test area with mineral spirits or water to preview contrast before choosing a finish system. That test helps avoid one of the common mistakes in raw timber projects: cutting a beautiful section into parts before anyone checks how the color will read under finish.
Defects are the third reading. Checks, knots, pith, bark pockets, insect trails, stains, and soft areas can all be useful information. Some become design character. Some become waste. Some require epoxy, bowties, butterfly keys, or a complete layout change. The source-based lesson is to mark those areas before milling continues. A pencil, chalk line, straightedge, and camera note can save more material than a faster saw pass.
Machine Access And Shop Control
Large raw timber work begins before the blade reaches the wood. The shop needs a flat support path, enough outfeed space, and clamps or stops that prevent the stock from shifting. If the log is round, uneven, or partly flattened, the first support decision matters. A wobbling piece can pinch a blade, break a cut line, or create a dangerous kick or roll. Even in a small shop, the mindset should match a sawmill: stabilize first, cut second.
The best machine for the next step depends on the material. A bandsaw mill, chainsaw mill, track saw, circular saw, planer sled, router sled, jointer, or thickness planer may all appear in this kind of workflow, but none of them should be chosen for drama. They should be chosen for reach, control, cut quality, dust management, and the amount of flattening required. When the wood is oversized, a slower tool that stays square can beat a powerful tool that forces the operator into a bad stance.
Blade condition matters too. Dirty bark, grit, and hidden inclusions can dull an edge quickly. Before a finishing pass, the shop should remove loose bark and surface debris, check for metal, and decide whether the first cut is a rough opening cut or a cleaner reference cut. The difference matters. A rough cut reveals structure. A reference cut creates a surface that later tools can trust.
Layout Decisions Before More Cutting
After the reveal, the biggest mistake is treating every square inch as equal. It is not. The best face should be reserved for the part people will see first. For a table, that may be the center panel or bookmatched pair. For a cabinet, it may be door fronts. For a stair or trim project, it may be the long continuous run where grain direction creates visual flow. The source video supports this planning mindset because the reveal gives enough visual information to slow the job down.
A strong layout pass includes four marks. First, mark the cleanest continuous grain. Second, mark defects that must be avoided or stabilized. Third, mark possible cut lines with extra allowance for flattening and sanding. Fourth, mark orientation so parts are not flipped or mismatched later. These marks do not require expensive tools, but they require discipline. The value of the timber depends on carrying the reveal forward into the finished design.
Moisture is another practical checkpoint. A beautiful face does not mean the timber is ready for final furniture dimensions. Thick slabs can hold moisture long after the outside looks dry. If the piece is still moving, final flattening and joinery should wait. A moisture meter and stickered storage can protect the work from cupping, twist, and open joints. That is a better buying lesson than chasing one magic machine.
Practical Inspection Sequence For A Giant Log Grain Reveal
A repeatable inspection sequence keeps the excitement of the giant log grain reveal from turning into waste. Start by clearing the surface around the timber so the operator can walk around it without stepping over cords, offcuts, bark, or clamps. The first minutes after a reveal are when everyone wants to lean in and look closely, but a heavy slab still needs the same safety zone it needed before the cut. Good shops make room before they make opinions.
Next, photograph the face before dust, handling, and extra marks change the surface. A phone photo is enough if it is sharp and square to the slab. That image becomes a reference when the board is flipped, stacked, or moved to another bench. It also helps the maker compare possible layouts without standing over the timber for an hour. For a small shop, this simple record can prevent mismatched parts later in the build.
Then check for movement risk. Look for end checks, open cracks, pith lines, and areas where the grain changes direction sharply. Those zones may still become useful, but they should not be placed blindly across a joint or narrow rail. If the plan is a tabletop, mark the cracks that may need bowties or trimming. If the plan is a cabinet or decorative panel, mark the sections where the figure is strongest and the structural demand is lower.
The next step is a moisture reading. A giant log grain reveal may look ready because the face is attractive, but thick timber dries unevenly. The outside can feel dry while the core remains wet. If moisture is high, the shop should delay final dimensions and store the slab with stickers, airflow, and weight. Rushing to final thickness can create cup, twist, open glue lines, and finish problems. Moisture patience is one of the most practical ways to protect the value of the reveal.
After moisture comes reference geometry. Use a straightedge and winding sticks to see whether the face is flat enough for layout. Many slabs need a rough flattening pass before accurate joinery decisions can be made. A router sled, wide planer service, or careful hand-plane work can create a reference surface. The important point is sequence: do not sand heavily before the reference surface is understood. Sanding follows flatness; it does not replace it.
Finally, choose the next cut by purpose. If the best grain is long and continuous, protect it for a large visual surface. If the best figure is concentrated in smaller pockets, consider drawer fronts, door panels, inlays, or accents. If a crack interrupts the center, decide whether it becomes a design feature or a reason to split the slab into narrower parts. A giant log grain reveal is valuable because it gives choices. The workshop earns that value by choosing deliberately.
Tool Checklist For Similar Work
For readers planning a similar project, the tool list should start with measuring and control tools: moisture meter, straightedge, winding sticks, chalk, pencil, tape, square, and a camera for layout notes. These tools help the maker understand the material before cutting away options. They are not glamorous, but they prevent expensive mistakes.
The cutting tools come next. A sharp chainsaw chain, bandsaw mill blade, track saw blade, or circular saw blade should match the scale of the job. If the cut is too deep for one pass, plan the cut from both sides or use a mill setup designed for the thickness. Never force a handheld saw into a depth or angle it cannot safely reach. The source lesson is control, not speed.
Flattening and surface preparation follow. A router sled can handle slabs that are too wide for a planer. A hand plane can clean small areas and read grain direction. Random-orbit sanders help after the surface is flat, but sanding should not be used to correct major twist or cup. Dust extraction matters because large dry timber can produce a heavy dust load quickly.
Clamping and assembly tools finish the list. Long clamps, cauls, winding checks, and dry-fit time can turn a dramatic grain reveal into a usable finished piece. Glue-up should not begin until the parts sit properly without force. When the timber itself is the visual feature, clean fit-up is part of the design.
Common Mistakes This Source Helps Avoid
The first common mistake is overclaiming. A striking face does not automatically prove rare species, record age, luxury pricing, or a guaranteed furniture outcome. Viewers may enjoy those ideas, but a useful workshop article should separate visible evidence from speculation. The visible evidence here supports raw timber inspection, grain reading, cautious cutting, and workshop planning. It does not support exact price or species claims without another source.
The second mistake is cutting for the camera instead of the build. A dramatic second cut may look satisfying, but it can remove the very figure that should have been saved. When the reveal is strong, the shop should pause, mark, and decide what finished parts need the best material. This habit matters for anyone buying tools too. A better blade or saw is only valuable when the operator has a layout worth protecting.
The third mistake is skipping dust and finish tests. Sawdust can hide defects and make color look flatter than it will under finish. A small test wipe can show whether the grain contrast is subtle, bold, warm, or uneven. That preview helps choose between oil, hardwax, film finish, or a more restrained sanding schedule. The finish plan should serve the grain, not bury it.
The fourth mistake is assuming one machine solves the whole job. Oversized timber often needs a chain of tools: one tool to open the log, one to establish a reference face, one to flatten, one to trim, one to sand, and several to clamp and assemble. Tecatool readers comparing tool purchases should think in systems. The giant log grain reveal is the start of the system, not the end of the work.
A final practical habit is labeling the sequence. Write down which face was opened first, which edge became the reference, which area is being saved for the show face, and which defects must stay out of joinery. Those notes make the project easier to resume after drying, flattening, or tool changes. In a busy workshop, clear labels protect the original grain decision from being lost.
When the project returns to the bench, those labels also help the maker explain each tool choice. The saw establishes the blank, the straightedge checks movement, the router sled or planer creates reference, and the sander prepares finish. That chain keeps the giant log grain reveal connected to a real build, not just a dramatic opening cut.
Buying And Workshop Takeaways
A giant log grain reveal is exciting, but the buying takeaway is restrained. Spend first on tools that improve inspection, stability, and repeatable cuts. A moisture meter, straightedge, reliable clamps, sharp blades, and dust control will help more readers than a larger machine they cannot safely support. If a project grows beyond the shop’s capacity, paying a sawmill or slab flattening service can be the better business decision.
The same logic applies to affiliate-style tool choices. Recommend a tool only when the job explains why it matters. A track saw matters when the slab needs a controlled straight cut. A router sled matters when the material is too wide for a planer. A moisture meter matters when the slab may still be moving. A dust collector matters when sanding large surfaces. The source video gives enough context for those practical links without inventing claims about price, rarity, or species.
For more woodworking process checks, see Tecatool’s guide to wood processing machine safety checks. That related article pairs well with this one because both focus on the same habit: make the operation understandable before asking a tool to do the work.
FAQ
What does a giant log grain reveal show first?
It shows grain direction, color contrast, checks, voids, and the best areas to reserve for visible furniture parts.
Should the workshop cut again immediately after the reveal?
No. The safer move is to inspect, mark defects, check moisture, and decide which sections deserve to become the main visible parts.
What tools are most useful after the first cut?
A moisture meter, straightedge, clamps, sharp saw blade, router sled or planer setup, sander, and dust control are the most practical tools.
Can the source prove the exact wood species or final price?
No. This article avoids exact species, age, horsepower, and price claims because those details are not confirmed by the visible source.
Source Video
Sources: